Photo documentation in a pest control company isn’t interesting because a technician can snap a picture of a site with a phone. That’s a given these days. What matters is whether the photos stay with the right service report, whether anyone still understands them months later, and whether they need to be gathered after the fact from the phone gallery, email attachments, and shared folders.
That’s exactly where most of the unnecessary work happens in practice. The technician takes photos but without descriptions. The office later downloads them separately, renames them, attaches them to the document, and tries to recall which image belonged to which issue. The result is visual evidence that technically exists but isn’t an integral part of the protocol.
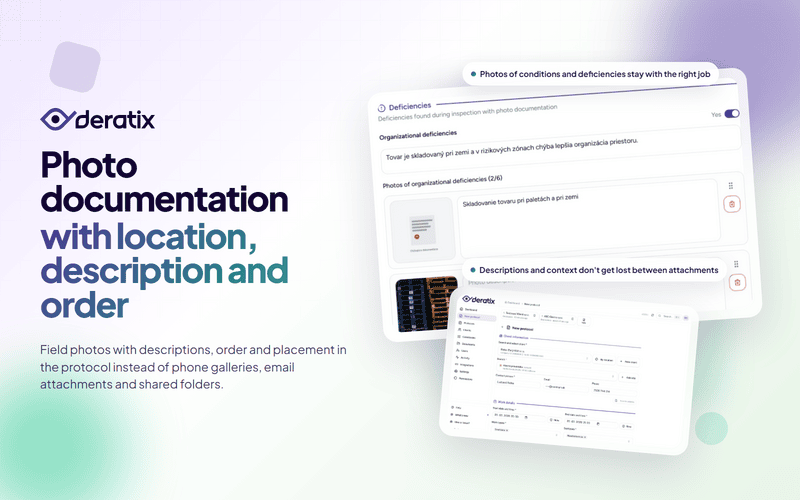
Photos belong with the protocol, not as separate attachments
If photo documentation is to serve both the client and your company, it must be part of the service record itself. Not a standalone album that needs to be somehow stitched together with the final document after the work is done.
That’s why the protocol form includes a dedicated photo documentation section. The technician adds images directly during the service visit, and they remain linked to that specific protocol from start to finish. When someone later opens the service detail or the PDF, the photos are right there — not in another system and not in a manually tracked attachment.

This matters especially during follow-up inspections, complaints, or audits. Instead of explaining “we probably still have those photos somewhere,” you open the specific protocol and see exactly what was documented on site.
Every photo has a description and order that carry forward
A photo alone often isn’t enough. After a few weeks or months, it may no longer be clear what exactly the image captures, which part of the premises had the issue, or why the photo mattered.
That’s why each photo can have a description added to it. The description doesn’t stop at the form — it stays with the photo in the protocol detail and in the final PDF. When the client opens the document later, they’re not just looking at a picture but also at its meaning within the context of the service.

Equally important is the order. Photos can be rearranged by dragging them to guide the client through the document: from the entrance, through the findings, to the measures taken. This order carries over into the PDF as well. It’s not a random file listing — it’s a readable visual sequence.
Overall site condition and specific deficiencies are kept separate
During a service visit, more than one type of photo usually gets taken. One group captures the overall progress or condition of the premises. Another serves as evidence for a specific deficiency. If everything gets mixed into one pile, the client receives plenty of images but has a harder time making sense of them.
That’s why the system has two layers. One is the standalone service photo documentation. The other belongs to the deficiency records, where photos are organized into three categories: organizational, structural, and hygiene-related. Each category has its own description and its own images.

This separation has practical value. The overall photo documentation shows the condition and progress of the service. Photos attached to deficiencies serve as specific evidence for what the client needs to address. The document doesn’t turn into a jumble where one image serves as an illustration one moment and as proof of a shortcoming the next.
Uploading follows clear rules on both mobile and desktop
Photo documentation is only usable when the technician doesn’t have to deal with technical workarounds. On a phone, they can shoot directly with the camera or add images from the gallery. On a computer, files can simply be dragged into the upload zone without unnecessary clicking.
It’s also worth knowing the rules:
- the standalone photo documentation supports up to 20 images per service visit,
- deficiency photos have a limit of 6 images per category,
- common image formats like JPEG, PNG, and WebP are accepted,
- iPhone photos in HEIC or HEIF format are automatically processed during upload,
- a single uploaded photo can be up to 10 MB.
Large images are resized during processing so they remain manageable later in the PDF and in the protocol detail. If the company has optimization enabled, images are further converted to a more efficient format without the technician having to configure anything manually.
Photos stay with the same service visit even without signal
In pest control work, a lot of photos are taken precisely where connectivity is weakest: in basements, utility rooms, underground storage, or production facilities. If photo documentation only worked online, the technician would quickly revert to a makeshift solution — shooting into the phone gallery and adding photos manually afterward.
During offline work, photos are saved directly on the device and remain part of the in-progress protocol. Once connectivity is restored, they’re uploaded automatically, and if the upload fails the first time, the system retries. The technician doesn’t have to track down what still needs to be added after regaining signal.
This matters for the office too. Instead of manually collecting images, they receive a completed service report with all photo documentation in one package.
Photos can be managed more safely with less risk of errors
Two common problems come up with photos: accidental deletion and loosely scattered files with no control over who can access them. Both can cause more damage than uploading the photo in the first place.
That’s why deleting a photo requires confirmation — an accidental tap won’t remove it instantly. At the same time, photos aren’t treated as loose attachments without context but as part of the protocol and its documentation. When someone later works with the service detail, the PDF, or a revision, it’s always clear where a given image came from and what it was meant to prove.
What photo documentation actually changes
Photo documentation isn’t important because it makes a protocol look nicer. It matters when it reduces the number of manual steps between the field and the finished document. The technician photographs the issue, adds a description, arranges the images — and that’s it. The office no longer needs to rename, move, or attach anything on the side.
When photos stay with the service visit, in the context of the right premises, and with meaning that holds up over time, they stop being just an illustrative add-on. They become a standard part of the evidence, client communication, and background materials for the next visit.
If you’d like to explore this area in more detail, continue to photo documentation, digital protocol, deficiency tracking, offline mode, creating a protocol, and protocol detail.